Cameras · Troubleshooting guide
How do I connect Power over Ethernet to a Verkada dome camera?
One cable does everything. Here is what to plug in, what the status light should do, and what to check if nothing happens.

Draft · Nov 13, 2026 · 9 min read
Editorial review pending. This sample article demonstrates the design; verify model-specific instructions before use.
Official Verkada walkthrough
Watch the hardware setup
See the installation guide and how to expose the PoE port on second- and third-generation dome cameras. Follow the guide for your exact model.
Model, power and network checks
Scope: cover removal and cable routing below refer to CD42-HW and CD52-HW indoor domes. Check the exact model label before following mechanical instructions. Other dome generations, outdoor housings and multisensor cameras have different mounting and power requirements.
- Power: check the model’s current data sheet, the capability of the individual switch port and the switch’s remaining total PoE budget. Standard 802.3af is sufficient for many indoor domes; some cameras or operating conditions need 802.3at or 802.3bt. Do not select a supply from the connector shape alone.
- Network: confirm an IPv4 address, gateway and working DNS on the camera VLAN. Use DHCP or a deliberately configured static address. The network administrator should check the current product- and region-specific endpoint requirements, including any proxy or TLS-inspection restrictions.
- Ownership: add the device to the correct Command organization before installation. Confirm that the installer can access the intended site and match the camera serial number to its device record.
- Record a baseline: note the camera model/serial, switch and port, cable route and planned location. These observations make later troubleshooting reproducible.
Connect, power and verify
Stage the camera before mounting
Work at a bench with a known-good short patch cable and the intended PoE source. This separates a camera or configuration problem from a long cable run. Leave the dome’s protective film in place until installation is complete.
Open the correct housing
For CD42/CD52 indoor domes, loosen the cover screws using the supplied T10 Security Torx tool and lift the cover. Keep pressure off the clear dome and lens. Use the model’s installation guide for the mounting hardware and screw sequence.
Seat the Ethernet connector and route the cable
Locate the camera’s Ethernet socket and fully seat the RJ45 plug without forcing it. Route the cable through the mounting opening with enough slack to avoid tension, but not enough to obstruct the cover. Inspect the latch and connector before closing the housing.
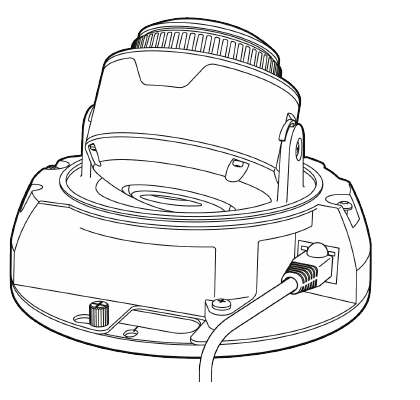
CD42/CD52 Ethernet connection · Verkada installation guide, page 5 (PDF). © Verkada. Other models differ. Connect to a compatible PoE source
With a PoE switch, connect the cable to a port that supports the camera’s required IEEE power standard. With an injector, follow its labeled data-input and PoE-output connections: the camera belongs on the powered output. Check the injector’s own instructions for its power connection.
Observe boot and firmware progress
Solid orange indicates startup; flashing orange indicates a firmware update. Do not repeatedly unplug an updating camera. Record the actual LED pattern and elapsed time if startup stalls. See the LED table below before treating orange as a power failure.
Verify service in Command
Confirm the correct device appears online, open live video and check that recorded history is accumulating. If the device has not checked in or updated after 30 minutes of staging, troubleshoot before mounting. Record the results instead of relying solely on the exterior LED.
Mount and repeat the checks
Use the model-specific mounting guide, confirm the viewing angle in Command, refit the cover and remove the protective film last. Repeat live-video and playback checks on the final cable run. Review the scene after dark for reflections or power problems.
Read the camera’s status light
Read the exterior camera LED separately from the colored status shown in Command. Patterns differ by generation. The table summarizes common states; use Verkada’s current LED reference for the exact model’s flash codes.
| Observed state | Interpretation | Next check |
|---|---|---|
| No light | Power or indicator state needs investigation. | Check PoE delivery, link indicators and a known-good cable/port. Do not declare the camera faulty from the exterior light alone. |
| Solid orange | Camera is booting. | Record elapsed time. The current LED reference allows up to 20 minutes to reflect the correct state when endpoints are unreachable. Persistent orange warrants power and network checks. |
| Flashing orange | Firmware update in progress. | Keep power connected; follow progress in Command. |
| Solid blue | Connected and recording. | Confirm live video and playback in Command to complete commissioning. |
| Flashing blue (supported models) | Recording, but unable to reach Command. | Check IP assignment and allowed outbound connectivity. |
| Blue/orange sequence or red pattern | Model-dependent diagnostic code. | Record the sequence. Consult the matching model’s LED table; red indicators apply only to specified newer models. |
If it does not power on or come online
No power: isolate one part at a time
Try a known-good short cable, then a known-good compatible PoE port or injector. Check the switch’s power allocation and remaining budget. Log which combination changes the result. A device that works on the bench but fails at the mount points investigation toward the installed cable path or site port.
Power but no cloud connection: check the network
Check the camera’s DHCP lease or static configuration, then DNS and the correct region’s required endpoints with your network administrator. Verkada’s Network Tester can help check reachability from the network where it is run; it is not proof that a different camera VLAN has the same access.
Persistent orange: distinguish boot from failure
Verkada’s offline-camera article suggests investigating power after 10 minutes; its newer LED reference says status may take up to 20 minutes when endpoints are unreachable. Check both power and reachability rather than diagnosing by timer alone. Never interrupt a flashing-orange update.
Blue LED, but the expected device is missing
Match the physical serial number against the Command record and correct organization. Verkada’s troubleshooting guide calls out serial mismatches for devices stuck waiting to connect. If the mapping is correct and the condition persists, contact support with the recorded evidence.
Escalate with useful evidence
Prepare the model and serial, switch/injector model, port, observed LED pattern, timestamps, IP assignment and results of cable/port swaps. Share device records and network details privately with authorized support. This is more actionable than reporting only “camera offline.”
Installation documents and references
Technical references checked November 13, 2026. Mechanical steps apply to the CD42/CD52 guide linked below. Editorial approval is still pending; check current model documentation before installation.
- Verkada: Camera Power Requirements (opens in a new tab)
- Verkada: Camera LED Status Indicators (opens in a new tab)
- Verkada: Camera Deployment (opens in a new tab)
- Verkada: CD42 / CD52 Indoor Dome Install Guide (PDF) (opens in a new tab)
- Verkada: Troubleshoot Offline Camera (opens in a new tab)
- Verkada: Required Network Settings (opens in a new tab)
Join the conversation
Share what worked for you, or ask a follow-up. No account needed.
Installation technician
Bench testing first is the best advice here. Finding a bad cable at a desk beats finding it at the top of a ladder.
Facilities operations
Our older switch was the issue. Two cameras stayed orange until we moved them to a PoE+ switch.
Monarch team
Good example Marco. If anyone is unsure what their switch supports, send us the model and we will check.